Those with access to Beta content have several champion focused classes to play. Among them is one that, if built correctly, can easily make walls of 20+ defense and attack for that much damage as well; all in a single turn while using only cards in their starting deck.
Yes, the Necromancer. A class so forgotten that only 2 exist on the top 1,000 leaderboard as of 8/17/2024; nearly 10 months after the class was released.
![]()
However, with recent shifts in the meta we see Necromancers changing builds and climbing. A class that was once thought to fizzle out after a few turns is suddenly snowballing their way to easy victories against the toughest of competition wielding the strongest of meta character builds.
We may have noticed that Wizards (primarily Half-Demon & Smallfolk) are currently dominating the meta. One may think that a class known for excessive damage and the ability to clear champions is bad for the Necromancer but a recent shift in builds makes the matchup far more than winnable.
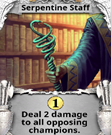
 Before we had Beta classes and Ancestries it was not uncommon to see the featured item “Serpentine Staff” on most Human Wizards. By default, the starting Wizard deck was high on economy but low on damage. Having this card (combined with the ability to stash it with the “Runic Robes” armor) Wizard was able to safely clear champions before it had a chance to buy and draw significant damage cards. At first the trend of using this card stayed true as those new to the Beta queue were met with not only Clerics but Bards, Druids, and Necromancers as well. With this in hand the matchups went from being Wizard favored to a nearly automatic win by any seasoned player.
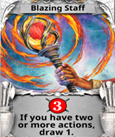
These days however, the champion-based classes have fallen in popularity and the pace of the game is much faster than at levels 12-14 when only Human characters were available. Now, with the addition of Ancestries and Treasures the Wizard is focused on trying to outpace Wizards in the mirror, Alchemists or those ever so scary Fighters & Barbarians. Due to this the Blazing Staff has seen play in a majority of builds; opening the door for Necromancer to give Wizards a challenge.
Market Cards: Snap Buys
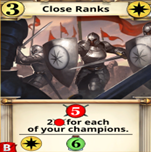
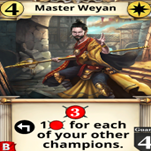
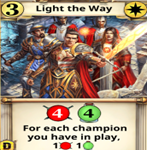
If we see any of these cards buy them. Skip our skill if we have to (we most likely will). The sheer amount of “damage goes brrr” from just having skeletons in play is insane. Even late game it can actually be beneficial to buy these cards rather than trying to skill and increase the defense of our skeletal wall. Should all three of these cards be on the market row, prioritize them left to right with “Close Ranks” being the superior of the three. (Light the Way has some merit over Master Weyan if against Barbarian, Fighter or Wizard as the healing will keep us in the game longer)
Market Cards: Premium Buys

Does anyone else find it odd that the faction based on healing and piety is very beneficial to one who walks side by side with death?
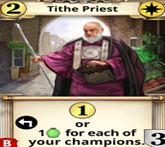
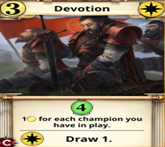
Shockingly the “Tithe Priest” makes a jump from a card we only purchase when needing to faction Imperial to a premium card. With a wall of skeletons out, this, as well as “Recruit”, can easily be healing for massive chunks while “Devotion” can become a crazy economy engine.
These cards are especially helpful in some of Necromancer’s weaker matchups (Barbarian, Fighter & Wizard) as the healing can help us counter our opponent’s steady aggression.
They are not “Snap Buys” because they offer defense and economy which are less useful in certain matchups. I would skip using our skill when the healing is needed or we want Devotion for some later buys. Frequently these cards can be skipped as many matchups can be quickly won through quickly creating a skeleton army. (More on that later in the “Matchup Data” section)
Market Cards: Deny Buys
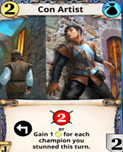
Even if we must skip a turn using our skill, I highly recommend we buy these four cards. At all levels of play these four cards can single handedly either wreck our wall or provide an insane econ boost for our opponent. The first three are to prevent our opponent from easily clearing our skeletal wall while the “Con Artist” can prevent our opponent from making future big buys after a wall clear.
There are more powerful (and more expensive) cards that will bring about our downfall but our chances to ever afford them are low. However at Level 11 we can choose an upgrade called “Voidstone” that will solve this problem.
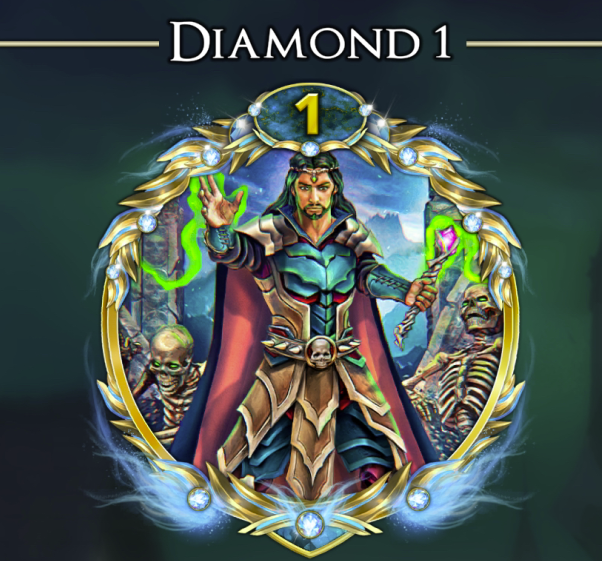
Level 1: Are we sure this class is good?
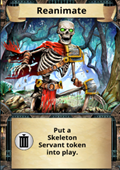
Ok hear me out; It gets better. I promise! ![]()
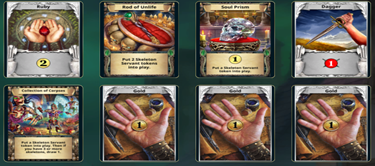
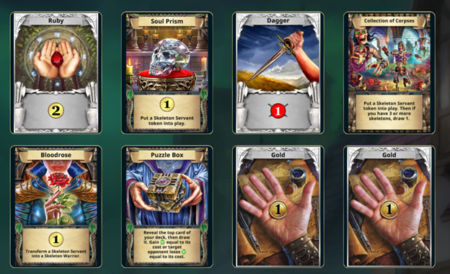
The starting deck and skills leave much to be desired but if we can survive till level 6 we’ll start to see how dominant this class can become. At early levels the only reason to skill is if we need the extra 1 damage our skeleton provides or if we are trying to draw a card from “Collection of Corpses.” (Also helps to save “Reanimate” for when we need to trigger this draw.)
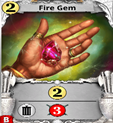
Our starting damage is pitiful so play our best econ game and improve our deck the way we would any lower-level class. When possible, try to sac out our pitiful “Dagger” and don’t be afraid to hoard fire gems.
Levels 2-3: Are we there yet?

No! I said we need to survive till 6, remember? Until we can upgrade our skill, we are arguably worse off than a vanilla starting deck. Just stick with it and be glad that it will only take a handful of games to reach relevant upgrades. For now, the losses may pile up due to our low starting health and lack of impactful starting cards. At least at level 3 our ability has potential to make good use of champions (ours and our opponent’s!)
Level 4: The Horde Stirs

We have now reached our first upgrade choice. Like most classes (not all) I recommend we upgrade our skill here and again at level 6. Doing so will finally give us a consistent thematic “Undead Horde” game plan.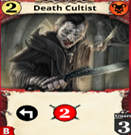
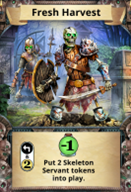
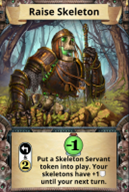
The end goal for Necromancer is to snowball our opponent with a never-ending wall of skeletons. While “Fresh Harvest” gives us more skeletons (and thus more immediate damage) our goal is for the skeletons to survive. I recommend “Raise Skeleton” to increase the defense of all skeletons including those summoned by our other cards. The extra 1 defense over 3 or more skeletons will make them problematic to clear and if nothing else will save we some health in the long run.
Aim to purchase as many random guards as possible to protect our skeletons. We can easily win games by creating up to 12 skeletons (the allotted maximum) behind random guards such as the easily affordable “Death Cultist”.
Level 5: Chose Your Destiny!
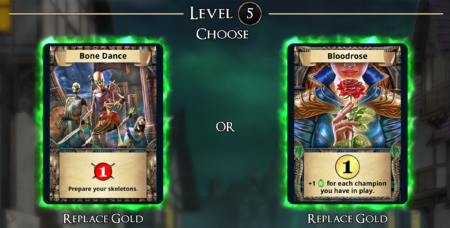
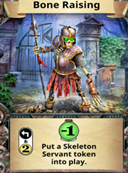
The dramatic title is intentional. Here we chose to replace a gold to either keep some economy and help us defensively (with the recent healing change added to” Bloodrose”) or to include what is arguably the most damaging starting deck card in all of Hero Realms.
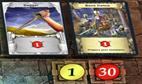

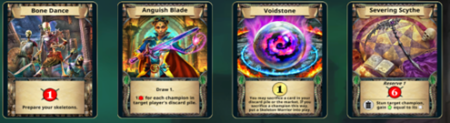
In keeping true to the namesake of this article I highly recommend we pick “Bone Dance.” What we see here are screenshots from my second turn of two recent level 16 games. Do not adjust our picture. With just starting cards this is what Necromancer is capable of.
Level 6: A Skeletal Warrior Appears
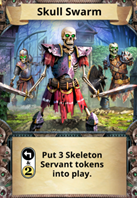
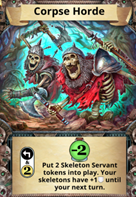
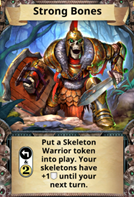
Originally “Corpse Horde” was the most popular choice as it gave multiple skeletons while providing some sustain in the form of increased defense. However the biggest knock on Necromancer (after their economy) is their low health pool. At 49 health dealing two damage to ourself to try and create something somewhat defensive eventually leads to our own demise. Now we may be thinking of taking “Skull Swarm” to frequently have those 30 combat turns but I am going to recommend “Strong Bones”. The Skeletal Warrior is a guard. The 2 defense (and 2 damage) guard combined with giving all our skeletons +1 defense allows our skeletons to easily survive the first few turns of a game and allows we to create snowball turns with “Bone Dance” as the game progresses. Furthermore, now that we can consistently summon our own guards, we no longer need to purchase every random guard we see and can instead focus our attention on the Snap, Premium and Deny buys as well as using our skill every turn.
Fire gems actually become an almost “Premium Buy” as the 2 gold they provide ensures we will be able to summon a guard and boost our skeleton’s defenses. (Always sacrifice them when drawn)
Level 7: Power Underwhelming
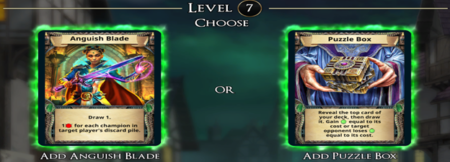
If we chose the “economy” route then Puzzle Box has a chance to pop off. However if trying to win through sheer force of skeletons both choices are some of the worst level 7 options in the game. I found the “Puzzle Box” to have more meritat lower levels when we are buying cards to supplement our deck. At higher levels we make very few purchases so I like “Anguish Blade” as a majority of starting decks have at least 1 champion. The damage from “Anguish Blade” is NOT retroactive. When possible make sure to have that opposing champion in the graveyard before we play and draw.
Level 8: The Thieving Cleric (Part 1)
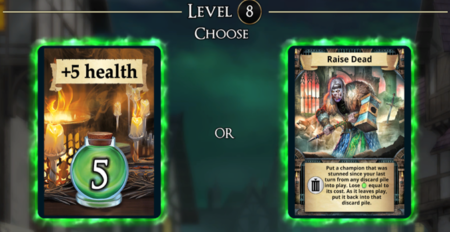
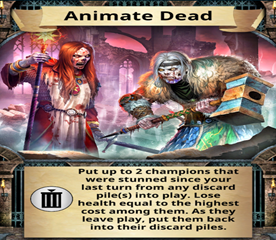
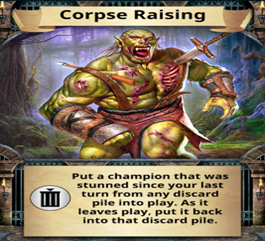
“Animate Dead” is our version of Cleric’s “Mass Resurrect” while “Corpse Raising” is just a straight upgrade to “Raise Dead” as we no longer lose life. With “Strong Bones” providing us with guards every turn we can steal a powerful non guard champion such as “Roland” and torture our opponent over multiple turns. However we will more frequently be using this to grab a denied “Tithe Priest” or one of the Deny Buy champions as it can be nice to keep our opponent from replaying them. Pick “Corpse Raising” as it leads us down the path to “Reawaken”.
Level 9: Affirm Your Destiny
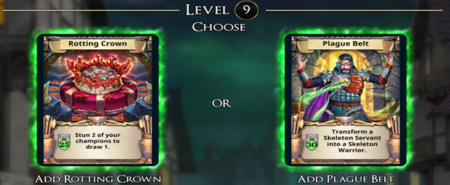
If we decided to go the economy route, then pick the “Rotting Crown” as the card draw will make our buying potential more consistent. If we favor building a never ending wall of skeletons and like having guards pick “Plague Belt”. If sticking with the article recommendations go “Plague Belt” as the Warriors really hold up our wall.
Level 10: The Thieving Cleric (Part 2)
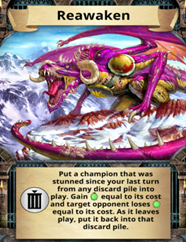
While not impossible to bring back multiple champions we will often find ourself going several games without having an opportunity. For this reason I recommend “Reawaken” as it not only brings back a champion but we heal ourself and deal damage directly to our opponent equal to the cost of the champion. Bring back Arkus? Heal 8, Deal 8 and make use of the champion until they kill it. Remember; bringing back non guards can be protected by our Skeletal Warriors and are harder for our opponent to reclaim. We can use this on our own champion as well but there is nothing like stealing their card and using it against them immediately. By simply having this Ability we are punishing our opponent for buying a champion or scaring them off from even buying champions, especially expensive ones.
Level 11: To Sac or To Buy?
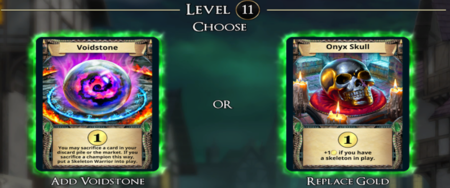
If we have been striving to be the one to purchase champions and make a wall then we have the option to upgrade a gold with “Onyx Skull”. This essentially turns a Gold into a Ruby and allows we to consistently make purchases. However as we touched upon earlier there are several cards which we cannot easily afford and can single handedly defeat us.
The “Fearsome Foursome”

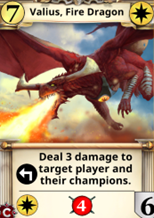
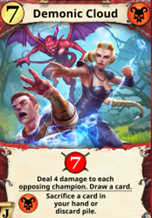
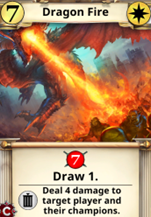
With the “Voidstone” guaranteed to make an early appearance we can deny these troublesome cards before they can be bought. While “Kalibok the Defiant” does require synergy to trigger its powerful effect, it is a cheaper option than the other two and can be frequently purchased on the first deck flip. “Valius, Fire Dragon” and “Demonic Cloud”, however, do literally wreck our skeletal walls single handedly. “Dragon Fire” does as well but it being a one off to do so makes it the least scary of this “Fearsome Foursome”.
For the purposes of creating a skeletal wall and winning with “Bone Dance” we need every tool possible to keep our wall intact. For this I recommend “Void Stone” and for we to always target a “Deny Buy, Fearsome Foursome” or when in doubt; any champion on the row. Summoning an extra skeletal warrior (guard) every turn goes a long way to keeping our wall alive and creating a snowball effect. If none of these are possible we can consider saccing out that useless Dagger or a Gold in our discard.
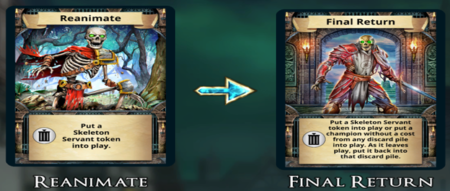
Level 12: Reanimate… really?
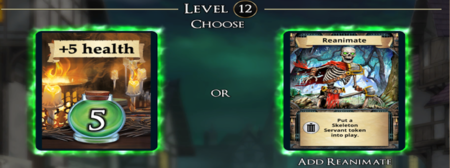
The Necromancer build I have been recommending wins on momentum; a steady supply of skeletons that eventually create high damage turns due to “Bone Dance.” I recommend we take “Reanimate” to ensure we trigger the draw from “Collection of Corpses” or to add to an already powerful “Bone Dance” especially on our first few turns of the game. It additionally gives us a target to use our “Plague Belt” on for the turns where we only summon Skeleton Warriors. If going the economy route (and the “Skull Swarm” skill) we would chose health here.
Level 13: Reserves

Here we have two very straightforward options. “Sitcher’s Kit” allows us to further an economy (and champion) acquiring gameplan while “Severing Scythe” allows us to push our aggression, instantly stun a champion to push more damage, as well as allowing us a guaranteed use of “Reawaken” should an opponent put a champion before us.
I am going “Severing Scythe” here due to the fact that it deals 6 more damage per flip. We will most likely sac this against the first 4-8 cost champion we see and use Rewaken to instantly put on some pressure.
Level 14: Ok, NOW we take Health Upgrades
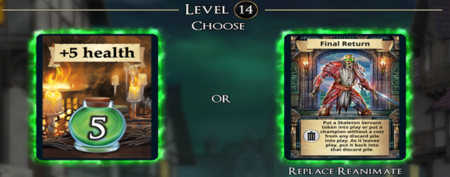
We just wanted “Reanimate” to aid in our early aggression and card draw. Now we want to try and keep our guard generating armor online as long as possible by taking a +5 Health Upgrade. If going the economy route (and the “Skull Swarm” skill) we would chose health here.
Level 15: 6 > 5
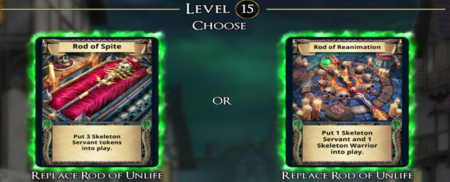
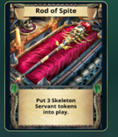
At first glance both these cards have merit. “Rod of Reanimation” provides those ever important guards while “Rod of Spite” just makes a bigger wall. What is important to note is that both choices provide 3 total defense and damage but “Rod of Spite” provides 6 total defense after using our “Strong Bones” skill while “Rod of Reanimation” provides 5 total defense. I recommend the “Rod of Spite” for a wider and higher defense wall. (Also more skeletons means our Snap & Premium Buy cards have a stronger effect). The main downside is that it creates non guards which will not protect us late game. They are also an easy clear for Half-Demon’s “Hellfire”.
Level 16: More Health
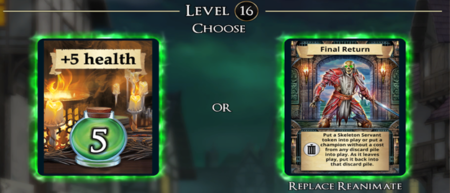
Finally we have the simple choice to bring our health total to 59 or take “Reanimate” if we did not do so at levels 12 or 14.
Matchup Data:

![]()
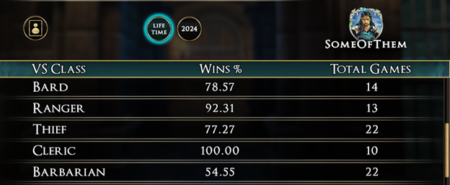
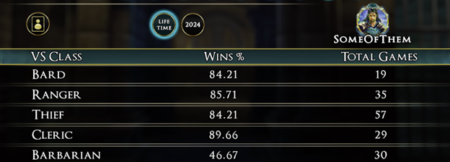
Above we have my Necromancer at Platinum with a total of 185 games played and some decent matchup sample sizes. All matchup data and commentary is relevant to my build below. I had previously run “Puzzle Box” and found that it only triggered in a very small handful of games, usually for just 1-2 combat/healing. I swapped to Anguish Blade which usually adds 1-4 combat per game.

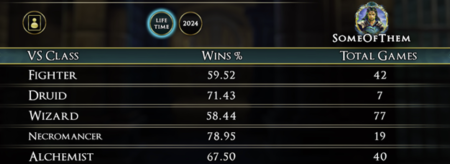
Below however I will show the data captured the moment after I finally reached Diamond on 8/22/2024. We can see that with a larger sample size (now 355 games) there was a significant change in a few matchups especially as I ran into different builds of Alchemist, Barbarian, Monk & Cleric:
![]()
General Tips:
- Skill every single turn unless:
- A “Snap, Premium or Deny Buy” is on the row.
- We went first and did not get a means to generate multiple skeletons.
- The opponent has a guaranteed means to clear our defense boosted skeletons and there is a powerful card such as “Command or Wolf Form.”
- We can only put 0-1 additional skeletons in play this turn. Therefore we have 3-6 gold (assuming 5 cards). This will be a good time to make a purchase. Outside of “Snap, Premium & Deny Buys” aim for something with card draw, card cycle, sacrificing from hand and/or discard, or just any affordable damage or discard we can deny our opponent (“Hit Job, Daring Escape”, etc.)
- If our hand is 3 Gold, 1 Dagger and “Bone Dance” consider “Skill + Reanimate + Plague Belt” for some damage. This holds especially true if our opponent has little to no chance to clear both guards.
- Do not be afraid to “Reawaken” the first champ with a cost we stun. There are usually only 1-2 opportunities per game, especially if we are hitting for 15+ with “Bone Dance.”
- When choosing to use “Void Stone” on our discard pile or a champion on the market row there are many factors to consider:
- It is imperative that we immediately remove any of the “Fearsome Foursome” (“Kailibok the Defiant, Valius Fire Dragon, Demonic Cloud, Dragon Fire”). When possible, target the champions first to summon a skeletal warrior.
- It can be beneficial to target our dagger while it is in the discard pile on a turn where we have an underwhelming skeleton presence rather than add more skeletons by targeting a market champion.
- In conjunction with at least one purchase that can scrap we can use this as an opportunity to scrap down quickly and see “Bone Dance” more often.
- If we have built a large lead and can only lose to a flip revealing a “Fearsome Foursome” that our opponent can put into play immediately then we can play it safe and not sacrifice anything from the row with “Void Stone.”
- Remember every time we target the market row we could be flipping better cards for our opponent since we lack the economy to make significant purchases.
Fighter
 Any one of the Fighter’s three skill upgrades is a problem for us. They are nearly guaranteed to clear our wall every turn so it is essential to purchase those Imperial healing cards. With them we can win the race. This is also a great matchup to buy random cheap champions when imperial healing is not available but try not to rely on this if our opponent has “Flaming Longsword” at level 15+. At lower levels steal the “Shield Bearer” to easily protect our skeletons. This is very handy if still using “Raise Dead” as shield bearer has no cost and will not damage us once it leaves play.
Druid
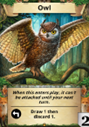
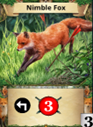 Small sample size but I recommend we take our first opportunity to steal the “Owl” for cycle (at lower levels) or an upgraded “Fox” (at higher levels) to deny them cycling or consistent damage. Non guards are particularly good in this matchup as they have trouble consistently getting past our guards to take them out.
Wizard
 Immediately check their deck for “Serpentine Staff” as it will drastically change our gameplan. If it exists we will very often skip skilling to instead buy any cheap actions that give card draw, cycle or damage. We may even want to invest into fire gems to potentially make one bigger purchase on turns 3-5. Do not be afraid to “Reawaken” the cat if the +1 gold means we can make a purchase. If they are the more common “Blazing Staff” build we usually skill every turn with the exception being a “Snap or Premium” buy is available. The general goal is to keep up skeleton pressure and force them to use their Abilities to clear. Every time we skip our skill it is making the Wizard’s life much easier. However the “Snap & Premium” buys offer plenty of healing & defense to help us sustain and are worthy additions in this aggressive matchup.
Necromancer
For the mirror matchup skill every turn and buy nothing but “Snap, Premium & Deny” cards. Save Reanimate to trigger “Collection of Corpses” or when we desperately need the damage to clear their skeletons. Whoever keeps the most skeletons in play wins. Skip fire gems as we want a higher chance of simply drawing our skeleton synergy cards quicker.
Alchemist
I want to give a special shout out as I am currently 16-1 against Alchemists not named “CCAA” and 11-12 combined against both their Spectacles & Glove builds. It is however through much testing with CCAA that we have determined how much I really emphasize we purchase those “Snap Buys” to essentially reload with swing damage turns.
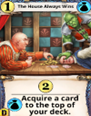
 CCAA and I have also seen that besides those cards it is often correct to buy nothing as the Necromancer (at higher levels) in order to have more frequent turns of summoning skeletons for an eventual “Bone Dance.” We should however make sure to “Deny Buy” and add “The House Always Wins” to that list when facing Glove builds. This cheap and often overlooked economy card can easily be factioned by Alchemists and with their armor they can instantly draw powerful (and expensive) cards.
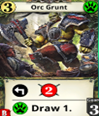
However if we do find ourselves with extra gold look to buy other cheap cards with factioned effects that Alchemist can easily trigger. For example the “Orc Grunt” becomes an annoying wall that can lead to free card draw for any Alchemist build. The “Goblin Guardian” is a similar card for which they can easily trigger the discard effect.
Bard
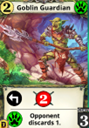
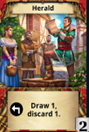 The more champions are on the row the better chance the Bard has to get going. Deny them cards like “Goblin Guardian” when possible as discarding can easily prevent us from skilling or making a significant wall. We can frequently use “Reanimate” early in this matchup. Steal “Herald” for permanent cycle as Bard has trouble clearing skeletons.
Ranger
 Ranger will most likely need to use their abilities early to not only cycle but to clear our skeletons so skill every turn. If they cannot possibly clear our wall, use “Reawaken” on their starting champions. Since they are not guards we can frequently keep them in play all game for their amazing effects.
Thief
 One of the upsides to making few purchases is that lower level and “Masterful Heist” Thief will have nothing to steal. However since we will frequently be discarding cards I recommend we grab some economy to ensure we have 2 gold for our skill every turn. When against the popular “Smooth Heist” Thief it may be prudent to buy economy on our first turn to deny them an efficient “Smooth Heist.” However on subsequent turns if we have 4 total gold consider buying a “Fire Gem” so we do not risk flipping them a good buy.
Cleric
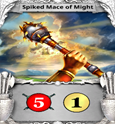 Without the “Spiked Mace of Might” Clerics lack a consistent way to clear our guards. Half-Demon Clerics can use “Hellfire” on our non-guards but even so we can just snowball them and create an immortal wall situation by turn 3. Funny enough the “Premium” buys become ways to simply deny cleric additional healing as we never need the healing ourselves. What we do need to look out for are “Breastplate” Clerics. Should they acquire enough champions we are at risk of being stalled and eventually out-walled.
Barbarian
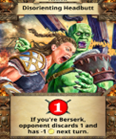 Add some economy to our deck. Between forcing us to discard cards or using “Disorienting Headbutt” we frequently lack the 2 gold necessary to skill and sustain our skeletal wall. Remember the discard effect is now on even more cards than ever with the addition of Dungeons & Journeys. If we can establish a wall we can potentially race the Barbarian with large “Bone Dance” turns. However it is a race that we lose often.
Monk
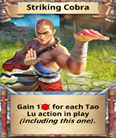 Small Sample size but pay special attention to how often they can bring back “Striking Cobra” as without it they cannot clear our skeletons. However if the Monk keeps a proper “Split Deck Situation” they can ensure “Striking Cobra” is played every single turn to easily clear 2+ skeleton warriors. Try to add additional champions to make their job more difficult. This can also be a matchup to acquire econ and snag cards that cost 6+. It can be especially difficult for the Monk to clear our skeletons every turn and make significant large purchases.
Alternative Builds

Till this point the article focuses on a build that aims to use our skeletons for defense that turns into offense. There is however a build that can make use of our skeletons to instead create card draw and economy.
Welcome to the other side of Necromancer where the biggest difference is our lack of “Bone Dance.” This build instead leverages “Bloodrose” to keep gold in our starting deck while giving us a little defensive power. The choice of “Puzzle Box” allows us to have potential built in healing while also a potential late game damage swing should we use it to draw an expensive card.
Instead of bolstering our skeleton’s defenses every turn we aim to use them for an economical advantage. By choosing “Skull Swarm” as our skill we put 3 skeletons into play for no loss of health. Now we have fodder for our “Rotting Crown” armor to draw a card. Using this combo we become a sort of “Reverse-Helmet Cleric.” We actively remove our own champions (skeletal fodder preferred) to quickly churn through our deck and hunt for our econ treasure “Stitcher’s Kit.” With it we have substantial buying power. We can also (once per game) sacrifice the Kit to place a champion to the top of our deck and then draw it via the “Rotting Crown” or get a guaranteed damage/healing for “Puzzle Box.”
By having more skeletons in play with “Skull Swarm” we now gain more damage, healing and economy from the “Snap & Premium” buy cards. In addition, if we play cards such as “Devotion” with three skeletons in play and then use “Rotting Crown” to draw, we keep the 3 gold gained from “Devotion” interacting with the skeletons. This combined with potentially drawing into more skeleton generating cards can lead to early large purchases and quickly deplete the market row before our opponent can generate their own economy.
The upside to this build is that it economically has a chance to compete with classes such as Wizard & Alchemist. The downside is we have less built in tools to handle Barbarian & Fighter. Matchups that are also previously winnable through brute force (Bard, Cleric, Ranger & Thief) now become a market row chess match. Essentially we are completely changing the style of game we want to play.
***It is also important to note here that we can use “Reanimate” to trigger the +1 Gold on “Onyx Skull” to allow for a potential purchase.
Memorial (Because we summon the dead, get it?)
If you’ve made it this far, “Congratulations! You’re A Nerd.”
Thank you for taking the time to read through my rambles. It has been a blast to take this forgotten class and turn it into a powerhouse that is taking down Alchemists and even Wizards.
There is always room for improvement and nothing I have said is to be taken as gospel. Someone will always eventually have a higher sample size or a different mindset to approaching the game.
Just remember to have fun and summon plenty of skeletons!
Title: Bone Dancing to Diamond; A Necro’s Journey (Levels 1-16)
Category: Necromancer
Tags: #Necromancer
Published on: August 23, 2024
Husband, father of two and aging gaming enthusiast. Ok born in 1987 so not that old but adulting does eat up a ton of time. This is why I enjoy the realms games! Being able to play them on mobile has been a blessing for my gaming timing management and to take it one step further I play the paper versions with my family as well. It has even allowed me to scratch that competitive itch which has resulted in 6 Legend Tournament Finals appearances and 4 total trophies between Hero Realms (1) and Star Realms (3).